Monday, May 30, 2011

How to Promote Website Promotion tips

tags : How to Promote your website learn website promotion tips and tricks to promote your website

Webiste Promotion Guide

Very often we receive questions about how to promote new website and get more visitors. While it’s easy enough creating new website from zero, everything becomes much more complicated when it comes to website promotion, online advertising and traffic. There is no wonder, because website promotion requires lots of skills and experience, and not all webmasters know how to start.
This guide was written to help you attracting more visitors and increasing website traffic. It should be useful for newbies and advanced users, because this guide covers most aspects of successful site marketing and most of methods are explained step by step. However, if you believe some methods are above your technical skills, don’t worry. Just skip these methods and continue to other. So enough chit chat, let’s get started!
#1 – Search Engines Traffic.
Natural (or organic) traffic is type of traffic coming from all major search engines. If any visitor searches for some kind of information and finds your site in results, you get organic traffic! Unfortunately, it can be really hard (depending on your niche) to get website listed in the top of search engines. So one of things you may want to do – submit your URL to all major search engines manually. Usually just visit any search engine (where you want URL to be submitted) and type something like “submit URL” into search box. Engine will surely return a page where you may submit your URL for indexing. If your sites contains sitemap file (like sitemap.html or sitemap.xml), be sure to submit sitemap file as well - it will speed up whole indexing process.
#2 – Links Exchange.
External links never hurt. The more websites will link to you, the more traffic you will get. It’s that simple! Swapping links is easy enough. All you need to do – find related websites and contact their webmasters asking to exchange text links with you. Ask webmaster to add your link to his site, and do the same for him. However, try exchanging text links with high quality sites only. Having links on junk site (which has low number of visitors) will not help much. It’s better to have one link from big website instead of having 10 links from tiny sites, remember it when looking for links exchange partners. If you want to know what is the easiest way finding links exchange partners, do this  - visit www.dmoz.org, select category related to your website, and then simply email webmasters of sites you like. Another way to find link partners is searching on Google.com for your top keywords. For example if you are willing to rank for "blue widgets", go to google.com and do a search for this keyword. You will get a list of top websites now try to contact owners of these websites and request link exchange.
#3 – Link Directories.
There are thousands of link directories on the Internet. Some of them are free, and others are paid. This time we will focus on free directories only. Having links on directories not only helps increasing search engine rankings, but also help getting more visitors who come from directories to your site directly. The biggest free directory on the Internet is dmoz.org, but it accepts only very high quality websites. If you believe your site is really high quality, try submitting it to dmoz.org. Also you can find other directories easily. Just go to Google (or another favorite search engine) and type “free link directories”, "link directory", "backlinks directory", "links exchange directory" or something similar into search box. You will find hundreds of link directories waiting for your submission!
#4 – Social Networks.
Social bookmarking networks works in similar way like link directories, but there are some differences too. The main difference from link directories is popularity. Social networks get millions of visits per day, so you may get more traffic too. However, to become successful in social networking, your site must contain high quality content. When you submit your URL to social site, other visitors can rate it. If rating is high, your URL is moved into main page where more people can see it. Adding links to social networking sites also will help getting better rankings in search engines. This work is pretty hard, so you may submit URLs manually or use any automated social bookmarks submitter software – it’s up to you. And here is the list of top 30 social bookmarking sites (where you may submit your URL) -  http://www.ebizmba.com/articles/social30
#5 – Forum Traffic.
There are thousands of webmaster forums around, and most of them have special sections where members can reveal their websites for reviews and criticism. After posting a message about your website, you will get not only a direct backlink, but also professional tips and criticism from other community members. So you will know what needs to be improved. However, be sure to read forum rules before making any post (especially if you are a new member to forum). Different forums have different rules, and if your message will not comply to these rules, your account will be banned and message deleted. It’s better to spend minute reading basic rules, instead of posting message with your URL and getting everything deleted shortly. If you want to find forums where you may submit website for review, use  “webmaster forum”, “site showcase”, “show your site forum”, “site reviews forum” and similar terms in search engines – you will surely find hundreds of forums waiting for you.
#6 – Signatures.
Many message boards, blogs and other websites allow visitors using signatures. If links in signatures are allowed (once again, read forum rules first), add one or more links (most sites allow adding up to 3 links in signatures) in your own signature. Once you will post a message, signature with backlinks to your site will be automatically inserted below message. Nice and easy way to build traffic, isn’t it?
Well, there are many more ways building traffic and attracting more and more visitors every day, but these tips should be really good start point for most new webmasters. Yes, there are even bad and unethical ways of website promotion and money making online, but we will not cover these strategies at the moment. However, we’ll try updating this guide often to reflect the latest changes on the Internet and deliver you the best results possible. Don’t worry if you don’t see the results right after starting – experience will come!
Good luck!

Saturday, May 14, 2011

How To Increase Internet Downloading Speed

TAGS : hey how to Increase Internet Downloading Speed without any software 


I just found this good tips from my ISP. I am sure it works for you. 

Here's a simple little thing you can do to increase your bandwidth by at least 20%. 

Ok here we go... 

1.) log on as Administrator. 

2.) start - run - type gpedit.msc 

3.) expand "local computer policy" 

4.) then expand "administrative templates" 

5.) then expand "network branch" 

6.) Highlight the "QoS Packet Scheduler" 

7.) on right window double click "limit reservable bandwidth" 

8.) on setting tab check the "enabled" 

9.) change "Bandwidth limit %" to 0 

You're done.It would be a good idea to reboot after this.


get your fried IP while chatting

TAGS : Get your Friends IP Internet Protocol Address while you chatting on yahoo , facebook , or  chatting on other softwares find IP address of your friend while you are chatting with your fried hack your friend computer while you are chatting with your freind hacking ip address get your find your freind ip address


How to find your friends IP (Internet Protocol ) Address when your friend are chatting with you !


The person whom you are talking should be in your friends list if you want to know his/her IP.


Follow The Steps


  1. Click on Start Button from Task Bar 
  2. Click on Run then type CMD for open Command Prompt
  3. now start chatting with your friend
  4. in Command Prompt type "NETSTAT" without quote
  5. and it will show all the IP address connect with your IP Address


                                           Keep Enjoy and Impress your Friends or Girls Friends


How To Rename Recycle Bin

TAGS : Rename Recycle Bin Rename why recycle bin cannot rename what can I do for Rename The Recycle Bin of Windows XP Windows Crystal Windows Gold Rename the Recycle Bin of Windows XP


How to rename the Microsoft Windows Recycle Bin.

Question

How to rename the Microsoft Windows Recycle Bin ?


Rename Windows XP Recycle Bin to help of the following stepts 

  1. Click Start / Run
  2. Type regedit and press enter.
  3. Open the HKEY_CLASSES_ROOT folder
  4. Open the CLSID folder
  5. Open the {645FF040-5081-101B-9F08-00AA002F954E} folder
  6. Open the ShellFolder folder
  7. Change the Attributes data value from 40 01 00 20 to 50 01 00 20. Once completed change the CallForAttributes dword value to 0x00000000(double-click and change value data to 0). You must change both of these values to get the rename to appear.
After performing the above steps you will be able to rename the icon like any other icon. Right-click the Recycle Bin icon on the desktop and click Rename and rename it to whatever you wish.


Wednesday, May 11, 2011

Hosting website on your own local pc

TAGS : How To Host Website on your own local Personal Computer Learn To Web hosting on your own Computer from home


Web Hosting From Your Own Local Machine. (very Easy)

I know that all want to opt for a free hosting company especially AstaHost but equally many people want to host their own website, totally free of cost with all sort of supports and software support like "ASP", "FTP", "phpMyAdmin", "MySQL", "phpBB" etc etc, and they simply do not know how to do it so they opt for a free web hosting company which displays irritating ads on the limited web space with a freehostingdomain.freehostingcompany.com/freemembers/you and also do not give you almost any support, now forget all that , you can host your own site on your own computer.

Requirements:
1. High speed internet connection (atleast a broadband)
2. Respectable computer (you will surely not need an itanium or xenon server, but atleast a P4 with 512B RAM)

You will have to:
1. keep your pc 24 hours on (after all you are the server and its your responsblility to maintain uptime, a few hours downtime does not matter if you are just hosting a very small site for your friends)
2. dedicate the computer to hosting ( you cannot play games and expect people to view your site simultaneously)

well you got every thing then lets go

step 1: web server
you will need a web serving software to listen to the HTTP ports and serve the pages to requests

i recommend a simple software like Abyss and i will demonstrate this tutorial with it.

1. download abyss from here http://www.aprelium.com/abyssws/download.php

2. install it (its very easy and self explanatory)

3. now you will see a blue colored icon in you system tray right click and click console, you will be asked for username and password, enter the credentials you gave when abyss was getting installed.

4. your hosting directory will be %abyss path&\htdocs
eg if you choose the default option it will be C:\Program Files\Abyss\htdocs

5. paste your site files and all the directory structure here. (it should have atleast one index.html page)

6. now to view you page wich is hosted on your computer you have to enter your ip (not 127.0.0.1, its your localhost ip, and you cannot view pages over the net with this ip, so do not go around giving this ip to your friends.)
see the http://www.abyssunderground.co.uk/beginner-accessing.php page for more info

7. go to http://www.abyssunderground.co.uk/ip.php to find out your ip now copy paste the real ip in you browser and voila you have your website ready

8. now to give some respectable name go to freedomain.co.nr and register so that you have some site such as you.co.nr

9. now enter you.co.nr and you will be serving pages, should your ip change go the member page on freedomain.co.nr and get the dynamic ip update link

step 2: installation of server support

1. go to http://www.abyssunderground.co.uk/tutorials.php and install all the available support through the self explanatory tutorials.

2. remember to do this step after installing php
http://www.abyssunderground.co.uk/aw...ysql_extension

3. you now have PHP, MySQL, phpMyAdmin, Ruby, Perl, Python, FTP, phpBB, and ASP support for you site

you can enhance you site to the max and the the capability of enhancement are high,

opt for an more professional web server like Apache if you plan to serve better pages...

work on Linux servers they are more secure and useful.


Enjoy The Website hosting from  your home Local Server computer !!


Friday, May 6, 2011

Share File between Windows 7 and XP

TAGS : How to share file from pc to pc with ethernet cable you can share file and printers between windows 7 and Windows XP

If you have a home network and are running Windows 7 and have XP on other PC(s) you might want to share files between them.  Today we will look at the steps to share files and hardware devices like a printer.
Sharing Files In Windows 7 and XP
Sharing folders between two Windows 7 machines with the new HomeGroup feature is an easy process, but the HomeGroup feature is not compatible with Vista or XP.  For this tutorial we are using Windows 7 x64 RC1 and XP Professional SP3 connected through a basic Linksys home wireless router. 
First make sure both machines are members of the same Workgroup which by default is named Workgroup.


On the Windows 7 machine go into Control Panel \ All Control Panel Items \ Network and Sharing Center then click on Change advanced sharing settings.


You will want to verify the following settings under Advanced Sharing Settings for the Home or Work and Public profile.

advanced
You will want to verify the following settings under Advanced Sharing Settings for the Home or Work and Public profile.
home or work settings
If you want any user to have access the public shares turn off password protection.  This is located in Advanced Sharing Settings toward the bottom of the list. 
 turn off pw
If you want to keep it enabled make sure there is a log in account for the other XP machines and they have a password.
create pw
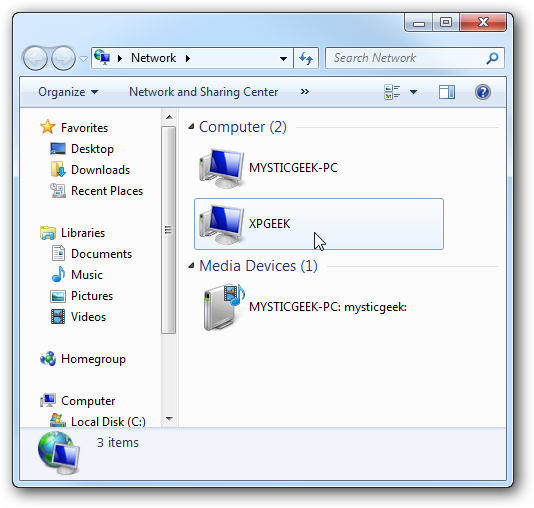
Now if you go into Network in Windows 7 you should see your XP machine and the Windows 7 as well which in this case is Mysticgeek-PC.
Explorer
To share the printer on the Windows 7 machine go into Devices and Printers from the Start menu and double click on the printer icon.
devices
Next double click on “Customize your printer”.
1 Printer
In the Properties screen click on the Sharing Tab and check the box to share the printer and type in its share name.
2 printer share
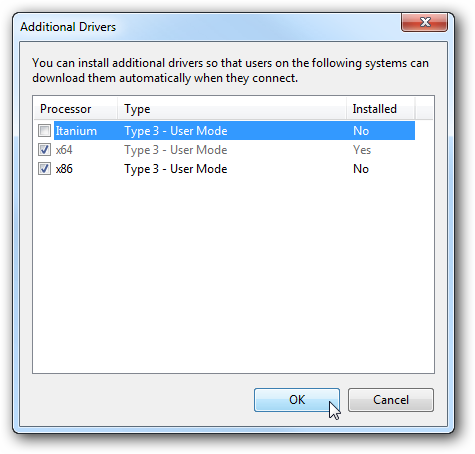
If your XP machine is an x86 OS you can install Additional Drivers before setting up the XP machine.
3 Printer add drivers 
To find the shared folders and devices double click on the Windows 7 machine icon under Network.  Here you can see the printer connected to my Windows 7 machine is shared and also the Users Folder.
shared device and users
Continue into the Users folder and Public to see the shared folders, here I also created a folder called XP Share just to keep everything in central location.
xpshare
Over on your XP machine open up My Network Places to find the Windows 7 (mysticgeek-pc) shared folder.
My Network Places
Double click on the Share folder to find a list of shared folders in the Public folder on Windows 7.  If you have password protection enabled you will need to type in the username and password of the user account on the Windows 7 machine first. 
folders
Setup XP With Shared Printer
To set up the shared printer in XP you will need to go into Printers and Faxes from the Start menu and kick off the Add Printer Wizard.
add Printer
Now select “A network printer, or a printer attached to another computer” then hit Next.
network option
Next select “Connect to this printer…” and type in the path for the printer connected to the Windows 7 machine and click next.  
print
Now click Yes to the confirmation message.
confirm msg
Then click Finish the printer to install and complete the Wizard.
Complete
In some cases you will need to install the x86 XP drivers for the shared printer because the Windows 7 drivers are not compatible with XP.  When everything is installed open up Printers and Faxes to find the shared printer.
in explorer
This should help you get started with sharing your files and other devices with your Windows 7 machine.  When I first started I was able to see the printer on XP right away because I had a HomeGroup set up, but once I deleted it I needed to share the printer like you would for a workgroup.  You might also have to do a couple restarts of the XP machine for it to see the shared resources on Windows 7.  If you have had any experiences with sharing between Windows 7 and XP leave us a comment!

                    Saturday, April 30, 2011

                    Start your Web Hosting Company

                    A lot of people think about starting a web hosting business. It might seem like an easy way to get rich, but as those who have tried it found out, it's not that easy. It should be clear to you that a web hosting business is not a get rich quick scheme.

                    And it's not an easy business to run. If you came to this page thinking that, then it's time to change your mind about it. It takes a lot of patience, computer and technical knowledge (Computer Science) to start and run a successful and solid web hosting business. If you think about starting a web hosting business, keep this thing in mind: don't jump in the water without learning to swim in the baby pool first... (Just quoting the owner of a web hosting business...)

                    1. Common misconceptions

                    Perhaps you heard about the innovation of Control Panels and that they make it easy for anyone to start a web hosting business. Indeed, they make a very complicated job simpler than it used to be, but the reality is that things don't get very simple - control panels still have their limitations.
                    Most people who contemplate about starting a web hosting business think that a server with let's say 80GB hard disk space that can cost as low as 100$ per month (2003 prices), can be can resold in pieces of 25MB at $5 each or even more. That would mean more than $16,000 in profits (1GB=1024MB !!!). Such a profit is something of a miracle, right?
                    And yet, even more bewildering is the fact that many of those who tried starting a web hosting business, and even old web hosting companies, go away BANKRUPT. But, you'll say, if I plan and provide live customer support, sincere efforts, money back guarantee, and try not to rip others off by charging excessively, I can succeed in successfully starting a web hosting business!
                    Well, it turns out that if you can see beyond the type of math presented above, you might be able to do it. But if you feel the above math is even close to reality, you'd better try starting a company in another field.

                    Like many other people, you might look at the cost of the hardware and figure that the rest is profit... But, if you plan to offer true support and guarantees etc. you'll find that profit margin isn't quite as big you thought it to be. This isn't to say you couldn't make a profit... but don't expect to be able to put 3200+ websites on a $100 server.
                    Also, you might think it's easy money. However, most people with a business of their own, whether they run a web hosting business or not, work twice as hard than they did when they worked for someone else. But, true, most of them have twice as much fun and some of them twice as much money (and some even more).
                    When you're just starting a web hosting business, it's just normal to try run it all by yourself in order to keep the costs low. That will put you in the position to work sometimes more than 14 hours per day. As you can imagine, you must have a certain "drive" to put yourself to that kind of work, especially when you're just starting the web hosting business and the cash flow is low. You have to find a way to motivate yourself in order to keep on working with little rewards.
                    Most people starting a web hosting business don't put enough time into assessing the real costs involved with running a web hosting business. Most people thinking about starting a web hosting business, as we've seen, are looking only at the positive side... There are negatives however: hiring help so you have 24/7 support, credit card processing fees, advertising budget, etc., etc...
                    I'd suggest writing a solid business plan. A business plan is really the only way to start a business. It's not a bad idea to try to find a job or apprentice with a web hosting business first. As an employee, without the risks of being the employer, you will see some of the requirements of running such a business.
                    Those who think about starting a web hosting business forget (or prefer to forget) that there are other companies out there who offer the same stuff that they want to offer. Don't make the same mistake. Keep in mind that the web hosting market is already saturated and highly competitive. There are so many new web hosting companies launched each week, if not each day, the majority of them trying to offer the cheapest packages, that it's very hard even for already established web hosting companies to face this competition.
                    What's even more dangerous is the fact that those new web hosting companies are in fact running straight into bankruptcy, but with so many of them still popping up like the mushrooms after the rain, the offer of very cheap web hosting solutions seems to never end. The well established web hosting companies face this unfair competition, but can't fight against it. There's no way to convince those new businesses to raise their prices.
                    All there is to do is wait. They'll go out of business soon enough. Unfortunately, new ones will take their place and there's no sign that this will stop in the near future! In fact things might get even worse, because the barrier to entry is very low, especially now with the depressed cost of dedicated servers. Also, the use of control panels allows almost anyone who is willing to master the skill to get into the business and start a web hosting company. Of course, in reality, it is not that simple, but that doesn't stop people who are basically unskilled and unprepared from trying. Although the Control Panels provide most of the basic features, they don't help you to do everything that needs to be done. Linux or Windows skills are still important to secure, configure and troubleshoot the servers.
                    Although there are many new entrants into the business, many of which are disillusioned about the business thinking that it's easy money and a huge pot of gold just waiting for them to take, it is not so. A lot of people tried hard in the business and got just a few new customers per week.
                    OK... Remember the 80GB example I gave you? There are several factors which would prevent you from selling 3,200 accounts on that one machine. Firstly, one has to consider server load. Putting too many sites on a single machine is a big no-no because they will over-stress it. That will lead in turn to increased level of downtime and support tickets.
                    Also, I deliberately refrained from even using the word bandwidth so far. Did it cross your mind? It's a very important aspect, because the server comes with a limited amount of bandwidth. If it comes with 400GB of bandwidth and you offer 1GB bandwidth per account, that would, in theory, limit you to 300 to 350 accounts for that particular machine. Of course, instead of using a 50-100 GB safe margin, you could, like many others in the business, oversell. But even then, you shouldn't go for 3200 websites. The risk would be too high.
                    Don't even think about starting another cheap web hosting business. There are too may such companies out there. Besides, although a low price can be a powerful marketing tool, as I once heard, companies concentrating all their efforts on offering the lowest price, in any business, will end-up finding that there's always another business ready to set the prices to even lower levels.
                    Also, most of the people who run a $5 per account web hosting business will tell you that there are no money to be made there. Usually it's the higher $10 and above accounts that really put the butter on the bread. The cheap accounts are, in the best case, merely a way to generate word of mouth.

                    2. The business plan - a maybe or a have to?

                    Lets start with a little bit of math - hypothetical of course. Let's say we setup 300 accounts on that server that we've been talking about.
                    Revenues (300*$5 less credit card fees) = $1280
                    Cost of Server = $100
                    Added Control Panel = $100
                    Cost of Advertising to get those clients = $300
                    Cost of support = $350 or if you are going to provide it all, take your current salary and put it here.
                    Total Costs = $850
                    Profit = $430
                    Profit per customer = $1.43
                    But! We have not taken into account the fact that when you're just starting the web hosting business the server is empty - you host no sites on it. That means in the beginning you'll have costs (server+control panel) that you'll have to cover somehow. Guess how! From your own pocket!
                    Can you spot another mistake in our assumptions? The advertising cost! It cannot be estimated the way we did. It really depends on a lot of factors (such as ad effectiveness, your ability to close the sales). Usually you will not be able to estimate this cost with accuracy before you actually start advertising your web hosting business. On the bright side, the advertising costs are not recurring every month like we assumed. Once you close those sales, you basically have them secured as long as you provide a good service.
                    So, if you want to get into the business, do your market research and do your business plan. Find out how much it costs you to get a new customer. Probably the best thing is to start small. Get a reseller account, something you can justify as a "waste" in your budget, because, as we've seen, it's probably going to be a long while before you turn a profit of any kind Don't jump right in with a managed/unmanaged dedicated server as it's liable to ruin you. Save all your income from the "business" and reinvest it if you can.
                    And do some more research on the market before diving into this. Read some books on server administration and hang around the forums like webhostingtalk.com. If you still have to ask a lot of basic questions, it only means that you shouldn't be starting that web hosting business yet. Wait until your questions get very specific. That's the moment when you're ready for starting a web hosting business.

                    3. Advertising your web hosting business

                    Remember, a web hosting business website is like any other website. The simple fact that you're a business is not enough to get you traffic. A majority of the cost would be to advertise, advertise and advertise. If you're just starting a web hosting business you have to compete with the more established web hosting companies and in order to be attractive, your offer and business plan need to be 'better' than the rest.
                    Technical skills and the server are the foundation of your business, but, as strange as it might sound, they're a minor part of the business. It requires a lot of "people skills" to deal with sales and support. And because it's going to be a 24/7 business, you would probably need to have a technical team to provide support to your clients as and when needed.
                    There are so many hosting companies out there that it's impossible for all of them to make huge profits, but, generally, it all comes down to how you market your web hosting business and how you treat your customers.
                    Get a few ad campaigns running. But be warned, it works for some, but not for others. Also, do some SEO (search engine optimization) on your web pages in order to rank high in the search engines. Considering how many web hosting companies are out there, I haven't seen that many optimizing their website's pages to rank high in the search engines. Don't concentrate on optimizing the homepage only. Try instead to write a few good articles, useful to anyone who owns a website. Write each article around a certain keyphrase(s). Use http://a-web-biz.com/outlinks/wordtracker.htm to find what people are searching for in the search engines.
                    And don't forget to get your site listed in DMOZ. It shouldn't be very hard if you follow the submission guidelines and it will do you a lot of good because it will greatly influence the link popularity (especially PageRank) of your homepage and thus of your other website pages.
                    Another way to increase link popularity and advertise your web hosting business is to submit it to directories. There are lots of web hosting directories out there. Try to get your website listed in as many as you can.
                    The web hosting forums might seem like good places to advertise your business for free, but there is a problem. The web hosting companies advertising there tend to offer way to much and ask for way to little. Try it if you want, but expect to find some outrageous prices, prices at which you'd go broke in less than two days.
                    Offer from your website a free piece of software. Although not offered from a web hosting business's website, the HostingEvaluator program (www.hostevaluator.com) actually advertises www.boutiquehost.com. With that piece of software they are not only sending traffic to the hosting business, but they also prove that they offer good service. Try it. It's free and very useful!
                    Another way to advertise your web hosting business is to host for free a few (or many) hosting, business or webmaster related websites, especially those offering valuable information, in exchange for a "hosted by yourcompanyname" banner on every page of that website. Don't expect them to accept a large banner at the top of the pages. That's much too obtrusive for almost any webmaster to accept. There's another place that usually gets a good amount of attention from the visitors: the navigational zone of the page (navigational links; e.g. the right part of every page on my website). Try to secure position for your banner in a similar position on their websites.
                    Many new hosters started by spreading the word locally to get the word of mouth to start. It simply proved that satisfied customers breed others customers. Word of mouth spreads like fire... when the service is good, and when it's bad!
                    Treat all your customers as if they were your first and your last customers. Build up a solid reputation of having quality support and customer care. You build this well, and the rest should follow. And remember... one disgruntled customer will shout a hundred times louder than any happy customer (in most cases) so make sure you don't put yourself in a bad position on purpose.
                    Getting customers is hard if you are expecting them to walk in and make you rich simply by submitting to a few search engines. It takes time, effort and money for most people in order to make their business popular. There are hosts who have excellent reputations, and word of mouth is their best advertising avenue.
                    You need to position your company differently. You need an idea to be different from the rest. Think about it, why should a customer come to you and not someone else? Yeah, I know, you'd like me to give you such ideas, but I don't have any. Why? Because I'm not thinking, like you are, about starting a web hosting business. I'm simply trying to get some things straight with this article. Besides, if I had a special idea, I would not simply give it away. I would be starting a web hosting business... My own... :-)
                    Back to advertising: offer free trials. You can offer one at your website, or you might want to go a place such as a restaurant and speak with the manager. Make an offer to give away FREE web hosting accounts to their customers. Of course not free for life. Free for a few months. Print some business cards and leave them by the register. Let the people test drive the web hosting. You have plenty of time to recuperate those money after they're "hooked"!
                    As I explained earlier, try not to position your web hosting business as yet another cheap hosting solution. Instead, prove people that there really is a difference between your service and the service provided elsewhere... I read on forums what a guy who owned a web hosting business used to tell his customers when asked why he charged more than they've seen in other places. He replied people with something like this: Why do people pay more to buy Nike shoes when they can pick up any cheap pair of shoes? Why would someone buy a Porsche, when a Geo will get them from point A to B just as well? And he kept on explaining until the customer was convinced. There will always be a place for the really cheap hosts and a place for the quality hosts. You just have to know your market. And you can explain that to your potential clients too.
                    I told you once, but I'll tell you again. A lot of people who are starting a web hosting business provide the customer service/support by themselves. Considering the fact that they also are in charge of advertising, maintaining the website, etc. it's only normal that they report working 14+ hour per day. Few if any are getting rich, but many earn a living. Having to respond to customers in a timely fashion to answer the same simple questions over and over for different customers really ties them down. Plus, when the server goes down, everyone on that server starts calling or e-mailing, swamping them. And they cannot reply to the emails sent by customers. That's when they lose a lot of good customers.
                    Take care of your customers, and they will take care of you! Nowadays, people expect 24 hour support. Will you be able to be on call 24 hours a day to handle all requests that will be coming in once you start your business? Prompt support is a really one of the most important aspects for the success of a hosting business, so you should ask yourself how much time you can put into this business. Since in the beginning, most likely you'll do everything by yourself, you will not be able to offer true 24/7 support. However, I recommend you to monitor your support email(s) and help desk every waking moment. You might be able to impress most people with your timely responses.
                    Perhaps the most important thing that you have to do right is actually very simple: you have to listen to what your customers want and then give them what they need. Doesn't sound very difficult, eh?

                    4. Shopping for a reseller account or a dedicated server

                    In hosting, as in almost anything else, price shouldn't be the only factor considered, or even the most important. Quality is the most important aspect. Then the price.
                    If you're going to resell someone else's services, then customer service and technical support are far more important than the price. The performance of the company you're reselling for will be directly reflected on you -- most of your clients won't accept "it's not our fault" as an explanation. I know I wouldn't.
                    Based on my experiences with web hosts, it seems many hosts one might go with are fine for awhile... then one has downtime and other problems. Many hosts run on thin margins so it's common to find them using IDE instead of SCSI drives for instance or overloading their servers with too many accounts (reseller and/or retail ones).
                    Many hosts maintain a support forum for their customers. You might visit the one for the host you are thinking of going with (if they have one) to get a feel for how things are with them.
                    There is a forum where people ask for opinions on hosts, as well as discuss various hosting topics. The URL is http://www.webhostingtalk.com/. Keep in mind there are a lot of young adults that go there as many web hosting companies are owned and run by teens and people in their twenties.
                    As for support options, some folks subcontract that out to companies like www.bobcares.com. They are located in India. You can do a search for them at the forum noted above and see what folks have to say about them.
                    Also, many hosts make their money by overselling space and especially bandwidth. Seems folks like having hosting accounts with large bandwidth limits, but don't use much of it. Keep that in mind when considering how much bandwidth and space is offered to you. When resources are oversold, one or few heavy user(s) can bring things to a crawl quickly for everyone.
                    If you decide to lease a Dedicated Server then you can review offerings from companies such as Rackshack.net, Eservers.biz, Rackspace.com, Cyberworldservers.com and may others. Each of those companies will allow you to lease a server on their connection, set a specified amount of bandwidth, and allow you to host your client's websites on that server.
                    If you're building your own data center and you're looking for bandwidth, check out Level3.com, Twtelecom.com and Verio.com, and for cheaper bandwidth visit Cogentco.com. Each of these companies will allow you to have bandwidth in your data center facility.
                    Just to be of some some help, here are a few companies that I found to provide good service (based on customers reviews at WHT):
                    Hostgator (which I've been using to host this very site for more than 6 years now; great performance, very stable servers)
                    DownTownHost
                    HostNexus
                    Httpme
                    Unitedhosting

                    5. Accepting credit cards

                    To accept credit cards, most of the just starting web hosting companies are using third party credit card processors, so they don't need a merchant account.

                    6. Final words

                    In conclusion, this is what you need to tackle (basically) if you're starting a web hosting business:
                    a) A business plan - this is the first thing that you need, but I bet it's not yet the first on your priority list
                    b) A server (or a reseller account)
                    c) A Control Panel - both for your use, but also for the customer
                    d) A merchant account (or you can use a third party credit card processor)
                    e) SSL Certificate
                    f) A website with a domain
                    g) An advertising budget
                    I will also add a list of things to remember:
                    - Don't take the "cheap hosting" road. It will not give you the rewards that you want and it can kill your business in the long run.
                    - Write a business plan.
                    - Get and assimilate as much information as possible. Ways to do that: get employed in the web hosting business, read books on the subject, participate in web hosting forums (ask questions, read threads), get used with Control Panels
                    - Become a webmaster. Learn HTML and some scripting too.
                    - Providing support is not one of the key aspects especially in a just starting web hosting business. If you're running the business all by yourself, time can become a problem.
                    - You need to accept credit cards online. Everyone in the business does.
                    - A web hosting business is just another business. It needs an advertising budget to bring in customers. Budget means both time do create the ads and money to buy ad space.
                    - You need to do a great job when shopping for a reseller account or a dedicated server. It's one of the most important decisions you will make for your business.

                    Friday, April 29, 2011

                    Install Windows XP with USB

                    How To Install Windows XP With USB Drive


                    Burn Windows Bootable Disk

                    How To Write or Burn Windows Xp, Vista or Windows Seven 7 bootable Disk


                    Install windows 7 or vista with usb

                    How To Install Windows 7 or Windows Vista with USB


                    This guide works 100% for Vista & Windows 7 unlike most of the guides out there. I have seen many sites/blogs that have “Install Vista from USB guide” but either with incomplete steps or not working guide. I have also seen some guides that don’t’ use proper commands in this guide. After spending many hours I have come up with this 100% working guide.
                    Bootable USB drive
                    I just did this method on one of my friends machine and installed the new Windows 7 BETA. The main advantage is that by using USB drive you will be able to install Windows 7/Vista in just 15 minutes. You can also use this bootable USB drive on friend’s computer who doesn’t have a DVD optical drive.
                    The method is very simple and you can use without any hassles. Needless to say that your motherboard should support USB Boot feature to make use of the bootable USB drive.
                    Requirements:
                    *USB Flash Drive (Minimum 4GB)
                    *Windows 7 or Vista installation files.
                    Follow the below steps to create bootable Windows 7/Vista USB drive using which you can install Windows 7/Vista easily.
                    1. Plug-in your USB flash drive to USB port and move all the contents from USB drive to a safe location on your system.
                    2. Open Command Prompt with admin rights. Use any of the below methods to open Command Prompt with admin rights.
                    *Type cmd in Start menu search box and hit Ctrl+ Shift+ Enter.
                    Or
                    *Go to Start menu > All programs > Accessories, right click on Command Prompt and select Run as administrator.
                    3. You need to know about the USB drive a little bit. Type in the following commands in the command prompt:
                    First type DISKPART and hit enter to see the below message.
                    Bootable USB Drive
                    Next type LIST DISK command and note down the Disk number (ex: Disk 1) of your USB flash drive. In the below screenshot my Flash Drive Disk no is Disk 1.
                    4. Next type all the below commands one by one. Here I assume that your disk drive no is “Disk 1”.If you have Disk 2 as your USB flash drive then use Disk 2.Refer the above step to confirm it.
                    So below are the commands you need to type and execute one by one:
                    SELECT DISK 1
                    CLEAN
                    CREATE PARTITION PRIMARY
                    SELECT PARTITION 1
                    ACTIVE
                    FORMAT FS=NTFS
                    (Format process may take few seconds)
                    ASSIGN
                    EXIT
                    Don’t close the command prompt as we need to execute one more command at the next step. Just minimize it.
                    Bootable USB Drive
                    5. Next insert your Windows7/Vista DVD into the optical drive and check the drive letter of the DVD drive. In this guide I will assume that your DVD drive letter is “D” and USB drive letter is “H” (open my computer to know about it).
                    6. Maximize the minimized Command Prompt in the 4th step.Type  the following command now:
                    D: CD BOOT and hit enter.Where “D” is your DVD drive letter.
                    CD BOOT and hit enter to see the below message.
                    7. Type another command given below to update the USB drive with BOOTMGR compatible code.
                    BOOTSECT.EXE /NT60 H:
                    14
                    Where “H” is your USB drive letter. Once you enter the above command you will see the below message.
                    8. Copy your Windows 7/Vista DVD contents to the USB flash drive.
                    9. Your USB drive is ready to boot and install Windows 7/Vista. Only thing you need to change the boot priority at the BIOS to USB from the HDD or CD ROM drive. I won’t explain it as it’s just the matter the changing the boot priority or enabling the USB boot option in the BIOS.

                    Install Windows XP with USB

                    How To Install Windows XP With USB Flash Drive ?                            


                    Prepping The Flash Drive

                    A few days ago while working with a DIY netbook, I was presented with the unique task of installing Windows XP without an optical drive. Not having an external USB optical drive, I planned to borrow one from a friend, but I was going to have to wait over a week before he could deliver it to me. So, I did the next best thing and hit Google in search of other options.

                    I had heard of installing Vista and even Windows 7 RC using a flash drive, but never XP (my operating system of choice). I spent some time researching and by combining a few things I learned on various sites, put together a method that was pretty quick and worked perfectly. I decided to make this guide (complete with clickable screenshots) for people like me who need a no-nonsense method of installing XP from a flash drive.

                    Before beginning, you need to make sure that the computer you plan to install Windows on can boot from USB. Check your BIOS or motherboard manual if you are unsure of this. You will also need a separate computer to prep the installation on the USB flash drive. You will need a flash drive at least 2 GB in size. Flash drives are extremely cheap so buying one shouldn't be a problem if you don't already have one this size or larger.

                    The first thing you need to do is download the three files below and save them on your desktop.

                    PeToUSB.zip

                    USBprep.zip

                    BOOTsect.zip


                    Once you have these downloaded, extract PeToUSB.zip and USBprep.zip separately. Then, copy everything from the PeToUSB folder to the USBprep folder. Now, copy the USBprep folder and place it in C:\

                    Also, extract BOOTsect.zip and put these files directly in the C:\ directory as well.

                    Next, you need to put your Windows CD in your optical drive and copy all of the contents from it over to a folder in the C:\ directory. I named mine "XP" so it would be easier to recall later.


                    Navigate to the USBprep folder in C:\ and double click the usb_prep8.cmd file (yours may or may not have the .cmd extension based on the Windows settings you are using. You can enable file extensions by clicking Tools, Folder Options, View tab, then unticking "Hide extensions for known file types" in the Advanced Settings list).

                    Clicking usb_prep8.cmd opens up the black and white command screen you see above. Follow the directions on-screen by clicking any button and you will be greeted with another window, PeToUSB. If you have your flash drive plugged in, the program should detect it and list it under the destination drive.

                    Click "Start" in the PeToUSB window, select "Yes" to continue then again click "Yes" when it asks if you are sure you want to repartition and format the disk. Once complete, click "Ok".


                    Leave all of these windows open and go to "Start", then "Run" and type in "cmd" to bring up the console window.

                    Type "cd c:\", without the quotes and press Enter.

                    Now type "bootsect /nt52 M:", without the quotes. In this example, "M" represents the letter of my flash drive. Yours will likely be different so be sure to check beforehand (it should be listed beside your device name in PeToUSB - if not there, simply double click My Computer on your desktop and locate the drive letter there.) then press Enter.

                    The command window will inform you that Bootcode was successfully updated on all target volumes.


                    Now, close out of the current command window and also close PeToUSB. Doing this will bring up a new set of options in the original command window, as seen above.

                    Press "1" then Enter and you will be asked to browse to the folder that you copied Windows to. Select the folder then click "OK".

                    Click back on the command window and press "2" then Enter. You will be asked to enter a drive letter that is not already taken. You may want to check in My Computer to be sure you select a letter that isn't already being used. In the screenshot above, I selected "O". Press Enter after selecting your drive letter of choice.

                    Press "3" then Enter and you will be asked for the drive letter of your flash drive. This is the same letter that you used earlier in bootsect. For me, that letter is "M". Input the letter and press Enter.


                    Finally, press "4" then Enter. You will be asked if you want to proceed with the format. Type "Y" then press Enter.

                    The system will pause a moment while the format takes place. Then you will be asked to press any key to continue... do so. This starts the first phase of the process which will take a few minutes.

                    Once again, you will be prompted to press any key to continue... do so. Another dialog box will pop up, asking you if you want to start the file copy. Click "Yes". The command window will again activate and start copying files to the flash drive which will take a few minutes.


                    After a bit, you will be asked if you would like USB-stick to be Preferred Boot Drive. Click "Yes".

                    Finally, a dialog box asks if you would like to unmount the Virtual Drive. Click "Yes".

                    That's it, you are done! You can close the command window and any other relevant windows that may still be open.

                    But, we are not done. Now comes time to install XP, which as you will find out, is a bit of a different process when using a flash drive. Continue ahead as we walk through this procedure.